MIDI Learn
Introduction
MIDI Learn allows you to map any physical MIDI controller — knobs, faders, pitch wheels, aftertouch — directly to any parameter in the synthesizer. Instead of relying on the fixed MIDI CC mappings built into the original firmware, you can create your own custom mappings that match your specific hardware setup.
This is especially useful when using external MIDI controllers that don’t follow the synth’s default CC assignments, or when you want quick access to parameters that aren’t normally available via MIDI.
Key features:
- Visual overlay mode — Enter MIDI Learn mode to see the mapping state of every parameter at a glance
- Automatic detection — Simply move a controller and the plugin figures out the MIDI message type and mode
- Multiple MIDI types — Supports Control Change (CC), Pitch Bend, Channel Pressure (Aftertouch), and Poly Pressure
- Relative encoder support — Two relative modes for endless rotary encoders
- Preset management — Save and recall different controller mappings for different hardware setups
- Auto-save — Mappings are automatically saved and restored when you reopen the plugin
- MIDI feedback — Send parameter values back to your controller for motorized faders or LED rings
- Input source filtering — Choose whether to learn from the DAW host, physical MIDI ports, or both
Quick Start
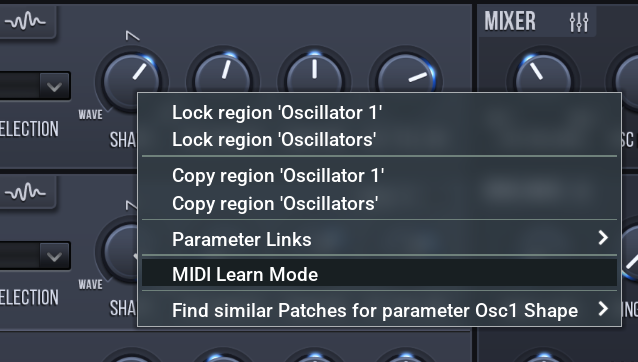
- Right-click on a control on the plugin UI and select “MIDI Learn Mode”
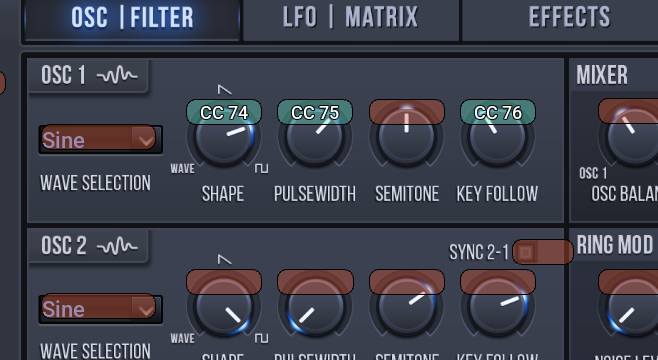
- Colored overlays appear on every parameter — red for unmapped, green for already mapped
- Left-click an overlay to start learning — it turns amber and shows “…”
- Move the MIDI controller you want to assign (turn a knob, move a fader)
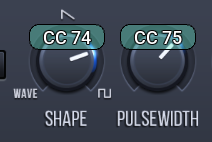
- The overlay turns green and shows the assigned controller (e.g. “CC 7”)
- Press Escape to exit MIDI Learn mode
That’s it! The mapping is saved automatically and persists across sessions.
MIDI Learn Mode
Entering MIDI Learn Mode
Right-click anywhere on the plugin interface to open the context menu, then select “MIDI Learn Mode”.
The Overlay Display
When MIDI Learn mode is active, every parameter in the plugin UI gets a colored overlay indicating its mapping state:
| Overlay Color | State | Meaning |
|---|---|---|
| Red/Orange | Unmapped | No MIDI controller is assigned to this parameter |
| Green/Teal | Mapped | A MIDI controller is assigned — the overlay shows the controller label (e.g. “CC 7”) |
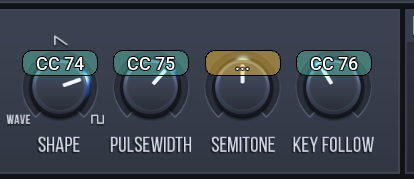
| Amber/Yellow | Listening | Waiting for MIDI input to learn a new mapping — shows “…” |
Learning a New Mapping
- Left-click on the overlay of the parameter you want to map — it turns amber and shows “…”
-
Move your MIDI controller — turn a knob, move a fader, press a key. You need to send at least two different values (e.g. turn a knob both directions) so the plugin can detect the controller mode.
-
Once learned, the overlay turns green and displays the controller assignment (e.g. “CC 74”).
If the MIDI controller you assign is already mapped to a different parameter, the old mapping is automatically removed and the new one takes its place. All overlays update to reflect the change.
Clearing a Mapping
Right-click on a mapped (green) overlay to remove the mapping. The overlay turns red to indicate the parameter is now unmapped.
Canceling Learning
If you started learning (amber overlay) but change your mind, right-click the amber overlay to cancel. The overlay returns to its previous state without creating a mapping.
Exiting MIDI Learn Mode
Press Escape or right-click and select “Exit MIDI Learn Mode” to leave MIDI Learn mode. All overlays disappear and the plugin returns to normal operation.
You can also clear individual mappings without entering MIDI Learn mode: right-click a parameter and select “Clear MIDI Mapping” (only shown if the parameter has a mapping).
Supported MIDI Message Types
The learning process automatically detects the type of MIDI message you send:
| Type | Description | Example |
|---|---|---|
| CC (Control Change) | Standard continuous controller | Knobs, faders, buttons |
| Pitch Bend | Pitch wheel messages | Pitch wheel, joystick |
| Channel Pressure | Channel aftertouch | Keyboard aftertouch (mono) |
| Poly Pressure | Polyphonic key pressure | Per-key aftertouch |
Automatic Mode Detection
For Control Change messages, the plugin automatically detects whether your controller sends absolute or relative values:
| Mode | Values | Use Case |
|---|---|---|
| Absolute | 0–127 linear | Standard knobs and faders |
| Relative Signed | 1 = increment, 127 = decrement | Endless encoders (signed mode) |
| Relative Offset | 65 = increment, 63 = decrement | Endless encoders (offset mode) |
Pitch Bend, Channel Pressure, and Poly Pressure are always mapped as Absolute.
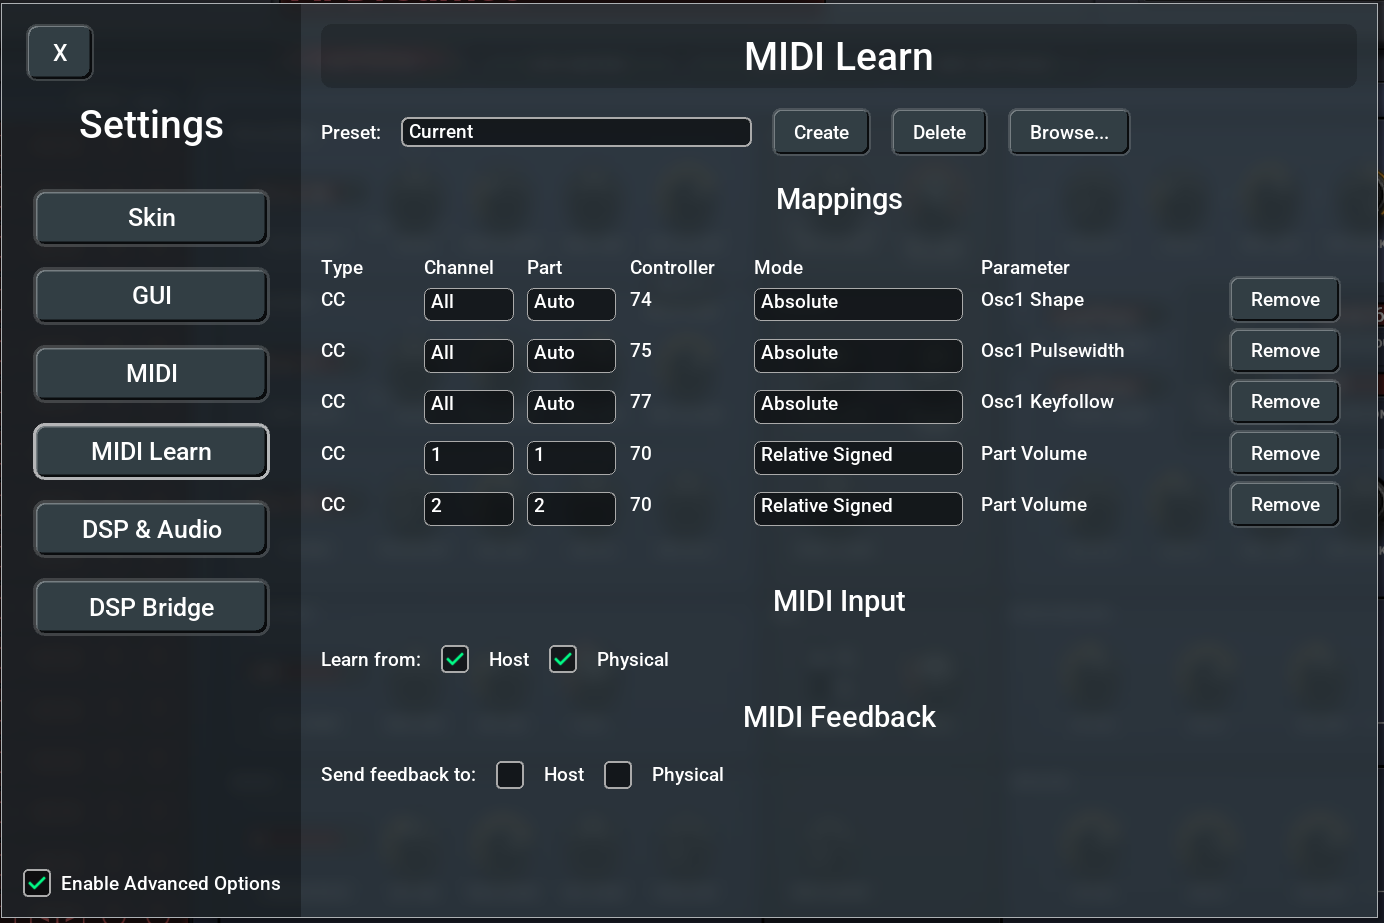
Settings Page
Open the Settings dialog by pressing Escape or by right-clicking anywhere on the plugin UI and selecting “Settings…“ from the context menu. Then navigate to the MIDI Learn page.
Preset Management
At the top of the MIDI Learn settings page, you’ll find the preset controls:
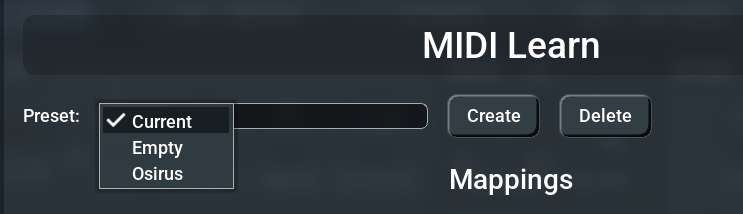
- Preset dropdown — Select a preset to preview or the “Current” entry for the active mappings
- Create — Save the current mappings as a new named preset
- Delete — Remove the selected preset (cannot delete “Current”)
- Apply — Commit a previewed preset (only visible when a saved preset is selected)
The “Current” Preset
The “Current” entry always represents the mappings that are currently active in the plugin. When you learn new mappings or modify existing ones, they are reflected here. Changes are auto-saved to a default preset that is restored when you reopen the plugin.
Creating a Preset
- Click Create
- Type a name for the preset
- Press Enter — the current mappings are saved under that name
The new preset is a copy of whatever mappings are currently active.
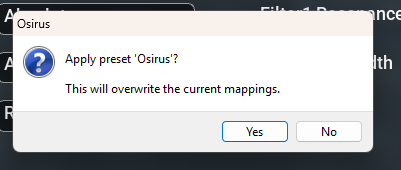
Previewing and Applying a Preset
When you select a saved preset from the dropdown, it is loaded as a preview. You can play and test whether the mappings work with your current setup. However, if you close the Settings dialog without pressing Apply, the previous mappings are restored.
To permanently switch to the preset:
- Select the preset from the dropdown
- Test it
- Click Apply
- Confirm the dialog — the preset becomes the new active mapping
Deleting a Preset
Select the preset you want to remove, then click Delete. A confirmation dialog appears. The “Current” entry cannot be deleted.
Mappings Table
The mappings table shows all active MIDI-to-parameter assignments:
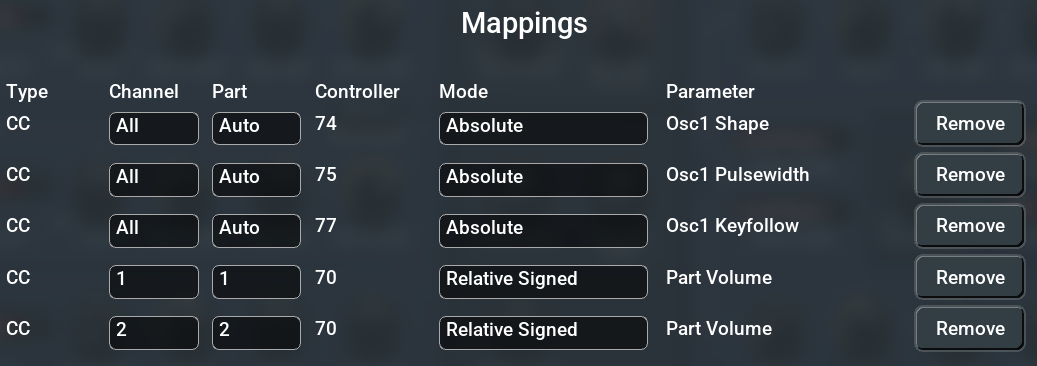
| Column | Description |
|---|---|
| Type | MIDI message type (CC, Pitch Bend, Chan Press, Poly Press) |
| Channel | MIDI channel (1–16) |
| Controller | CC number or note number (shown as “-“ for Pitch Bend and Channel Pressure) |
| Mode | Absolute, Relative Signed, or Relative Offset (dropdown, editable) |
| Parameter | Target parameter name |
| Remove | Delete this individual mapping |
You can change the Mode of any mapping directly in the table by clicking the dropdown. This is useful if the auto-detection picked the wrong mode for your controller.
MIDI Input
The MIDI Input section controls which MIDI sources are used for both learning and playback:

- Host — MIDI messages routed through the DAW (e.g., from a MIDI track)
- Physical — MIDI messages from directly connected hardware controllers
Enable one or both depending on your setup. If both are disabled, MIDI Learn will not receive any input.
MIDI Feedback
The MIDI Feedback section controls where parameter value updates are sent back as MIDI messages:

- Host — Send feedback to the DAW (useful for controller LED ring sync via the host)
- Physical — Send feedback directly to hardware controllers (for motorized faders or LED rings)
Feedback always sends absolute values, even for parameters mapped in relative mode. Feedback is only sent for changes originating from the plugin UI or automation — not for incoming MIDI (to avoid feedback loops).
Tips
- Multiple mappings per parameter — You can map the same parameter to multiple MIDI controllers
- One controller, one parameter — Each MIDI controller (same type + channel + CC number) can only control one parameter at a time. Assigning it to a new parameter automatically removes the old mapping
- Encoder detection — If your encoder isn’t detected correctly, you can manually change the mode in the mappings table
- Preset portability — Presets are saved as JSON files in the plugin’s configuration directory and can be shared between instances
- Auto-save — You don’t need to manually save after learning. Mappings are saved automatically after every change