██████╗ ███████╗██████╗     ██████╗ ██████╗ ██╗██████╗  ██████╗ ███████╗
██╔══██╗██╔════╝██╔══██╗    ██╔══██╗██╔══██╗██║██╔══██╗██╔════╝ ██╔════╝
██║  ██║███████╗██████╔╝    ██████╔╝██████╔╝██║██║  ██║██║  ███╗█████╗
██║  ██║╚════██║██╔═══╝     ██╔══██╗██╔══██╗██║██║  ██║██║   ██║██╔══╝
██████╔╝███████║██║         ██████╔╝██║  ██║██║██████╔╝╚██████╔╝███████╗
╚═════╝ ╚══════╝╚═╝         ╚═════╝ ╚═╝  ╚═╝╚═╝╚═════╝  ╚═════╝ ╚══════╝
Introduction
The DSP Bridge is a system that allows to run the DSP emulation engine of TUS emulator plugins in a separate process, on a separate system or on a different platform. The DAW plugin becomes just an editor while the DSP emulator is executed elsewhere.
Server Executable
The server is a small standalone executable that runs on either Windows, MacOS or Linux and can host an arbitrary number of DSP emulator devices as long as there are enough CPU and RAM resources.
DAW Plugin in Remote mode, aka Client
A DAW plugin can run in either Local mode or Remote mode.
The Local mode is the default, the plugin is a regular standalone plugin and is both an editor and an audio engine.
In Remote mode, the editor and all other features work as if it was running in Local mode, you will not notice any difference to Local processing. However, the DSP engine is executed on the server. The plugin sends audio and MIDI inputs from the DAW/plugin editor to the server and retrieves the audio outputs and MIDI output from it and sends it back to the DAW/plugin editor.
Concept
The communication between plugin and server is done via TCP/UDP networking. By using local network protocols, the following scenarios are possible:
-
Dedicated Server / 2nd machine for DSP emulators
If you run out of CPU or RAM resources in your DAW, you can run the server executable on a second machine. By using the emulator plugins in Remote mode, you move CPU (and some RAM) load to the dedicated server and free up resources on the machine running the DAW. Keep in mind, any additional RAM usage due to the use of custom skins cannot be offloaded to the server; this is part of the UI which still uses Client RAM resources. -
32 bit DAW support (planned)
If you have a 64 bit system but prefer/need to use 32 bit DAWs, you can use 32 bit versions of our plugins once they’re released. Our 32 bit plugins will not have the DSP engine built-in but will act as a 32 bit to 64 bit bridge only. By using the server executable on the same machine you can use our emulators in a 32 bit DAW environment while the DSP engine is executed in the 64 bit server application.
Once the server executable has been started, it waits for incoming connections by one or multiple plugins.
If a plugin is switched to Remote processing, the plugin announces its presence by broadcasting a packet in the local network. If the server receives such a packet, it checks if the plugin is compatible and responds with a reply to the plugin to notify it that there is a server that can be used.
Once a plugin receives a response from a server, the plugin attempts to connect to it to establish a connection. Upon successful connection, the server will create a DSP device that the plugin can work with via network.
Configuration
Firewall
On the server machine, open the following ports for incoming connections:
-
TCP 56362
-
UDP 56303
On the machine running the DAW/plugins, allow outgoing connections to:
-
TCP 56362
-
UDP broadcast to 56303
Server Setup
The server is an executable that can be executed from any location and by any user, admin permission are not needed. The server needs read access to the configuration file and the plugins to be hosted. Furthermore, it needs write access to the ROM cache folder.
Basic installation consists of unzipping the full contents of the archive and placing them (the .exe file, and the /plugins and /roms folders) into the appropriate data directory location described below, however you can override those with more advanced config file creation and editing if you choose.
Further server configuration is completely optional, you can start the server straightaway after unpacking the zip. If you wish to customize the installation from the default, please read the following section about the Server Configuration File. If you stay with the defaults, no config file is created or required.
The data directory (called $DATA below) is determined automatically and varies per platform.
-
Windows
$HOMEDRIVE$HOMEPATH\Documents\The Usual Suspects\dspBridgeServer\
(example:C:\Users\JonDoe\`Documents\The Usual Suspects\dspBridgeServer\`) -
Mac
$HOME/Documents/The Usual Suspects/dspBridgeServer/
(example:/Users/JonDoe/Documents/`The Usual Suspects/dspBridgeServer/`) -
Unix
$HOME/.local/share/The Usual Suspects/dspBridgeServer/
(example:/home/jondoe/.local/share/`The Usual Suspects/dspBridgeServer/`)
Server Configuration File
The configuration file is in a subfolder of the data directory:
$DATA/config/dspBridgeServer.cfg
Alternatively, the configuration location can be specified by passing -config <absoluteFilename> via command line.
The server configuration file is a regular key = value file, lines starting with # or ; are ignored and can be used as comments.
Properties:
| Key | Default | Description |
|---|---|---|
tcpPort |
56362 |
Defines the TCP port that the server opens for incoming connections by plugins |
pluginsPath |
$DATA/plugins/ |
Plugins need to be present in on of these folders |
| romsPath | $DATA/roms/ |
ROM cache is created here |
Example configuration file:
; specify TCP port
tcpPort = 56362

; Directory where plugins are loaded from
pluginsPath = ~/.local/share/The Usual Suspects/dspBridge/plugins/

; Directory where ROMs are cached
romsPath = ~/.local/share/The Usual Suspects/dspBridge/roms/
Alternatively, all configuration file properties can be set/overwritten via command line, too. For example, if you want to change the plugin directory, specify:
-pluginDir /etc/dsp56300/plugins
Server Plugins
For the server to work, it needs plugins. Plugins need to be copied to the pluginsPath directory as specified above. However, to start using the server straightaway, the server comes with prebuilt versions of all plugins that we have released.
You might notice that the prebuilt plugins are smaller than our Juce based plugins. That is because all parts not needed in a command line / server environment have been stripped. The sound engine is 100% identical of course.
The server supports multiple plugin versions as long as the DSP bridge protocol version is supported. If you want to support multiple plugin versions on a single server, rename the plugin files (for example by appending the version number) or create subfolders to your liking.
Copy all plugins that you want to support to the pluginsPath folder. A server restart is not needed, you can add new plugins while the server is running.
ROM Cache
Firmware ROMs for a plugin do not need to be copied to the server manually. If a ROM does not exist on the server yet, it is automatically transferred from the client machine to the server upon initial connection and is then cached. The ROM cache directory can be specified via the romsPath configuration option.
Client Setup
Currently you must enable the DSP Bridge manually for each plugin you wish to use with it. Eventually there will be a direct UI method to enable/disable DSP Bridge from within the plugin but for now please do the following steps to enable the plugin to “see” a DSP Bridge server. The following example is using Osirus on Windows; adjust your paths and emulator names accordingly for your own needs:
Ensure that the emulator/plugin is not running.
Browse to the centralized plugin folder for your emulator configuration file (Osirus on Windows example below):
C:\Users\[username]\Documents\The Usual Suspects\Osirus\config
Edit the Osirus.xml file (you may need to right-click and open it with Notepad, TextEdit, or some other text editor like Notepad++)
In the block of Properties containing the rest of the lines, add the following line exactly as it is displayed below to enable DSPBridge (you may also change val =”0” to disable):
<VALUE name="supportDspBridge" val="1"/>

Save the File when finished.
Usage
Once you have completed the server and client configuration as explained in the Configuration section, start the server first and then load a plugin as usual.
In the plugin UI, right click anywhere and select Device Type. In the Device Type submenu, select the IP address of the desired Remote Server.
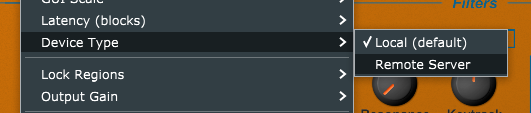
The plugin will attempt to find and connect to a server that is in reach in the local network. If the connection fails, an error message will be displayed.
You can switch between Local and Remote processing at any time.
Performance recommendations
It is highly recommended to use a wired local network connection with a speed of 1GBit or higher. Wireless connections are discouraged as the roundtrip time of network packets is not guaranteed and may cause audio dropouts.
Any packet filtering, antivirus software that monitors network traffic or complicated firewall rules may degrade performance, it is recommended to turn these off between the DAW host and the server.
Information About Latency
The latency setting that exists in the plugin UI is used for Remote mode too, i.e. the latency is identical to what is selected in Local mode.
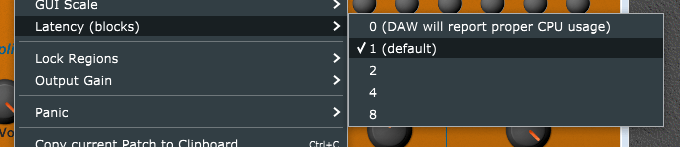
The selected number is the number of audio blocks of latency, i.e. if your audio driver runs at a block size of 128 samples and your select 2, the total latency will be 256 samples.
Recommended is a setting of 1 if the network connection is stable, higher numbers can help if the network is unstable or busy.
Can I Use the Zero Latency Option with DSP Bridge?
You may be tempted to use the setting for 0 blocks of latency, and with a very fast network connection you can achieve a true “zero latency” mode, but this is not recommended in general and is only useful if your DAW supports multi core processing and you use many plugins in a large project. Explanation:
Zero latency in Remote mode causes the plugin to send data to the server and then wait for its response immediately. Because the audio process has to wait for the server to finish audio processing and data transmission, the audio process in your DAW will be blocked and the DAW CPU meter will probably show a high number, depending on your network speed. Even though in reality, your CPU is not doing any work except waiting for the server.
If your DAW supports multi core processing, this might not be an issue. The DAW can still schedule processing of other plugins on other cores while the core with our plugin in Remote mode is waiting for the server.
But if your DAW does not support multi core processing at all, or if you have plugins chained in a way so that parallel processing does not work (because your reverb might need to wait for your plugin to return audio data), your DAW will be blocked waiting for the server to finish its work before it can continue audio processing.
Any latency that is higher than 0 solves this problem. Because if a block of latency is added, the plugin audio processing sends a processing request to the server, but it does not need the result immediately but one block later, freeing up resources in the DAW. When the next audio block is being processed, the result of the previous transmission will already be there and the result of this previous audio block will be returned to the DAW immediately.
FAQ
- Plugin says “No server found”
-
Ensure that the server is running
-
Check that the server and client machines are connected to the same local network
-
Check your Firewall configuration
-
Ensure that you have the plugin installed on the server that you use in your DAW. Note that the plugin version on server and client must match
-
Check that your server is compatible with your plugin. If you recently updated your plugin, update the server too
-
-
How many instances of a plugin can be run per server?
A server can run as many plugin instances as there are CPU and RAM resources available -
Can I host different plugins (Osirus, Xenia, …) with one server?
Yes, you can host as many different plugins as you want and you can even host different versions at the same time. Copy all plugins that you want to host to the pluginDir directory (see Configuration) -
What is the expected latency?
The latency can be adjusted, a latency of one block is the preferred setting. A zero latency mode exists also, but is not recommended. For details, see Information About Latency. - Can I host a server in the cloud?
While this is technically possible, it is highly discouraged due to latency. For realtime audio, latency should be as low as possible but connections via Internet are usually not reliable enough for such an application.